 Honda Accord: Transmission Range Switch Test
1. Raise the vehicle on a lift, or apply the parking brake, block the rear wheels, and raise the front of the . vehicle. Make sure it is securely supported.
2. Remove the left front wheel.
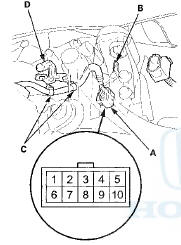
3. Disconnect the transmission range switch subharness connector (A), then remove the connector from the connector bracket (B).
Wire side o f male terminals
4. Remove the harness clamps (C) from the clamp bracket (D).
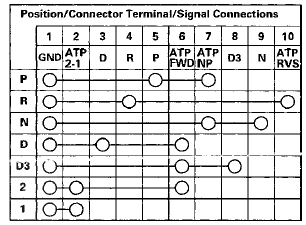
5. Check for continuity between the terminals at the subharness connector. There should be continuity between the terminals in the following table for each switch position.
Transmission Range Switch Subharness Connector
6. Transmission range switch test is completed if the test results are OK, go to step 13.
If there is no continuity between any terminals, go to step 7.
7. Remove the transmission range switch cover.
8. Disconnect the transmission range switch connector.

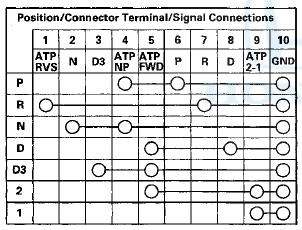
9. Check for continuity between the terminals at the transmission range switch connector. There should be continuity between the terminals in the following table for each transmission range switch position.
Transmission Range Switch Connector
10. If the transmission range switch continuity check is OK, replace the faulty transmission range switch subharness.
If there is no continuity between any terminals, go to step 11.
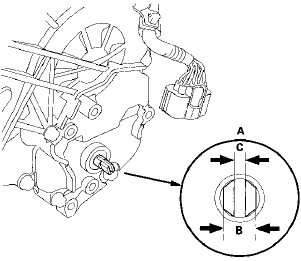
11. Remove the transmission range switch, and check the end of the selector control shaft (A).
Selector Control Shaft Specifications:
Width (B): 6.1 - 6 . 2 mm (0.240-0.244 in)
End Gap (C): 1.8-2.0 mm (0.07-0.08 in)
12. If the measurements of the selector control shaft end are within the standard, replace the transmission range switch (see page 14-240). If the measurements are out of the standard, repair the selector control shaft end, and recheck the transmission range switch continuity.
13. Check the connectors for rust, dirt, or oil, and clean or repair if necessary. Then connect the connector securely.
14. Install the harness clamps to the clamp bracket.
15. Install the transmission range switch cover.
16. Install the left front wheel.
 Circuit Diagram
...
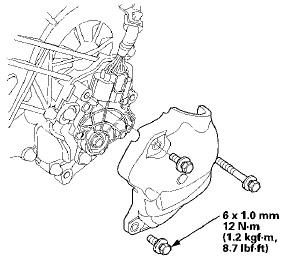
 Transmission Range Switch
Replacement
Transmission Range Switch
Replacement
1. Raise the vehicle on a lift, or apply the parking brake,
block the rear wheels, and raise the front of the
vehicle. Make sure it is securely supported.
2. Remove the left front wheel.
3. Mo ...
See also:
Driveshaft Inspection
1. Check the inboard boot (A) and the outboard boot (B)
on the driveshaft (C) for cracks, damage, leaking
grease, and loose boot bands (D). If any damage is
found, replace the boot and the boot ban ...
Trunk Lid Release Actuator Test
With Keyless Entry
1. Open the trunk lid.
2. Disconnect 3P connector f r om the trunk lid latch
switch/trunk release actuator.
3. Check actuator operation by connecting power to
terminal No. ...
Installing a Child Seat with LATCH
Your vehicle is equipped with
LATCH (Lower Anchors and
Tethers for CHildren) at the outer
rear seats.
The lower anchors are located
between the seat-back and seat
bottom, and are to be used ...