 Honda Accord: Taillight Replacement
4-door
1 Remove the rear bumper (see page 20-260).
2. Remove the trunk side trim panel (see page 20-132).
3. Disconnect the connectors (A) from the taillights (B).
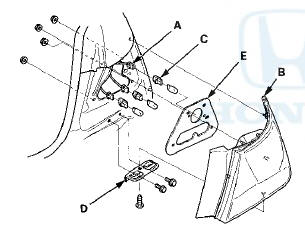
4 . Turn the bulb sockets 4 5 В° counterclockwise to remove the bulb sockets (C).
5. Remove the mounting nuts and bolts, then remove the taillight.
6. Remove the screw and separate the taillight and bracket (D).
7. Inspect the gasket (E); replace it if it is distorted or stays compressed.
8. Install the taillight in the reverse order of removal, and tighten the nuts to 5 N-m (0.5 kgfm, 4 Ibf-ft).
2-door
1. Remove the rear bumper (see page 20-260).
2. Remove the trunk side trim panel (see page 20-132).
3. Disconnect the connectors (A) from the taillights (B).
4. Turn the bulb sockets 45 В° counterclockwise to remove the bulb sockets (C).
5. Remove the mounting nuts and bolts, then remove the taillight.
6. Remove the screw and separate the taillight and bracket (D).
7. Inspect the gasket (E); replace it if it is distorted or stays compressed.
8. Install the taillight in the reverse order of removal, and tighten the nuts to 5 N-m (0.5 kgf-m, 4 Ibf-ft).
 Bulb Replacement
Headlight (High'Beam)
1. Disconnect the 2P connector (A) from the headlight
Headlight (High Beam): 60 W
2. Turn the bulb socket 45 В° counterclockwise to remove
the bulb.
3. Install a new b ...
 License Plate Light Replacement
4-door
1. Poll the license plate light assembly out, and
disconnect the 2P connector (A) from the license plate
light.
License Plate Light: 5W
2. Separate the lens (B) and housing (C), then rem ...
See also:
Radio Theft Protection
Your vehicle’s audio system may
disable itself if it is disconnected
from electrical power for any reason.
To make it work again, you must
enter a specific five-digit code with
the preset b ...
Recommended Engine Oil
Oil is a major contributor to your engine's
performance and longevity. If you drive the
vehicle with insufficient or deteriorated oil,
the engine may fail or be damaged.
This seal indicates ...
Front Passenger's Weight Sensor Replacement
4-Door
Removal
NOTE;
• Removal of the front passenger's weight
sensors must
be done a c c o r d i n g to Precautions and Procedures (see
page 24-25).
•The front passenger' s weight ...