 Honda Accord: Spark Plug Inspection
1. Remove the ignition coils (see page 4-20).
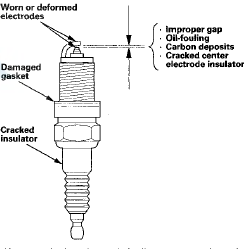
2. Remove the spark plugs, then inspect the electrodes and the ceramic insulator.
- Burned or worn electrodes may be caused by these conditions:
- Advanced ignition timing
- Loose spark plug
- Plug heat range too hot
- Insufficient cooling
- Fouled plugs may be caused by these conditions:
- Retarded ignition timing
- Oil in combustion chamber
- Incorrect spark plug gap
- Plug heat range too cold
- Excessive idling/low speed running
- Clogged air cleaner element
- Deteriorated ignition coils
3. If the spark plug electrode is dirty or contaminated, clean the electrode with a plug cleaner.
NOTE:
- Do not use a wire brush or scrape the iridium electrode since this will damage the electrode.
- When using a sand blaster spark plug cleaner, do not clean for more than 20 seconds to avoid damaging the electrode.
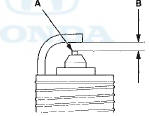
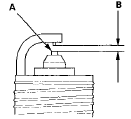
4. Replace the plug at the specified interval, or if the center electrode is rounded (A), or if the spark plug gap (B) is out of specification. Use only the spark plugs listed.
NOTE: Do not adjust the gap of iridium tip plugs.
All models except PZEV
Spark Plugs
NGK: IIZKR7B-11S
DENSO: SXU22HCR11S
Electrode Gap
Standard (New): 1.0-1.1 mm (0.039- 0.043 in)
PZEV model
Spark Plugs
NGK: DILZKR7A11GS
Electrode Gap Standard (New): 1.0-1.1 mm (0.039-0.043 in)
All models except PZEV
PZEV model
5. Apply a small amount of anti-seize compound to the plug threads, and screw the plugs into the cylinder head, finger-tight. Torque them to 18 Nm (1.8 kgf-m, 13 Ibfft).
 Ignition Coil and Spark Plug
Removal/Installation
Ignition Coil and Spark Plug
Removal/Installation
1. Remove the ignition coil cover (A).
2. Disconnect the ignition coil connectors (B), then
remove the ignition coils (C).
3. Remove the spark plug and inspect them (see page
4-20).
4. Appl ...
 Charging System
...
See also:
A/C Condenser Fan Circuit
Troubleshooting
NOTE:
• Do not use this troubleshooting procedure if the
radiator fan and/or the A/C compressor is inoperative.
Refer to the symptom troubleshooting index.
• Before doing symptom tro ...
Danger/Warning/Caution Label Locations
4-door Model
...
Hood Opener Cable Replacement
NOTE:
- Put on gloves to protect your hands.
- Take care not to scratch the body or the related parts.
- Take care not to kink the hood opener cable.
1. Remove these items:
- Front grille c ...