 Honda Accord: Power Door Mirrors
You can adjust the door mirrors when the
ignition switch is in ON  .
.
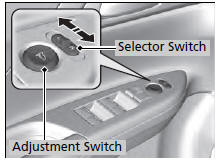
• Mirror position adjustment
L/R selector switch: Select the left or right mirror. After adjusting the mirror, return the switch to the center position.
Mirror position adjustment switch: Press the switch left, right, up, or down to move the mirror.
• Expanded View Driver's Mirror
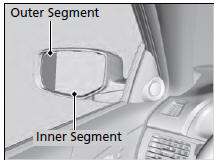
The driver side door mirror has outer and inner segments.
The outer segment is slightly curved to provide a wider angle view than a standard flat mirror.
This wider view may help you check areas that are not visible using a standard door mirror.
Objects visible in the outer segment of the driver side door mirror appear smaller than objects in the rest of the mirror. But in fact, they are closer than they appear.
Do not rely on your mirrors. Always look to the side and behind your vehicle before changing lanes.
 Interior Rearview Mirror
Adjust the angle of the rearview mirror when you are sitting in the correct
driving
position.
• Rearview Mirror with Day and Night Positions*
Flip the tab to switch the position.
The nigh ...

See also:
Cooling System
Component Location Index
Radiator Cap Test
1. Wait until the engine is cool, then carefully remove
the radiator cap (A). Wet the radiator cap seal with
engine coolant, then install it on a com ...
Shift Lock System Circuit
Troubleshooting
1. Connect the HDS to the DLC (A) located under the
driver's side of the dashboard.
2. Turn the ignition switch to ON (II). Make sure the HDS
communicates with the PCM. If it does not, go to the
...
Passenger's Air Mix Control Motor
Test
NOTE: Before testing the motor, check for HVAC DTCs
(see page 21-101).
1. Disconnect the 7P connector from the passenger's air
mix control motor.
Incorrectly applying power and ground to the
...