 Honda Accord: Front Turn Signal/Side Marker Light Bulbs
When replacing, use the following bulbs.

1. Turn the steering wheel all the way to the opposite side from the light being replaced.
Passenger side: Turn the steering wheel
to the left.
Driver side: Turn the steering wheel to the
right.
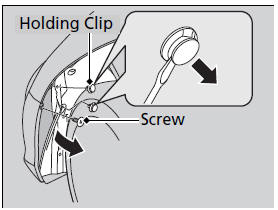
2. Remove the holding clips and screw, and
pull the inner fender back.
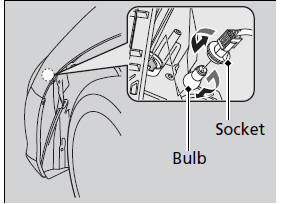
3. Turn the socket to the left and remove it.
4. Push in the old bulb, rotate to the left until
it unlocks, and remove.
5. Insert a new bulb.
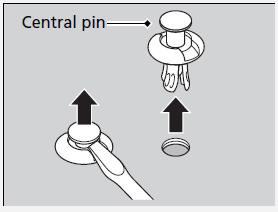
Insert a flat-tip screwdriver, lift and remove the central pin to remove the clip.
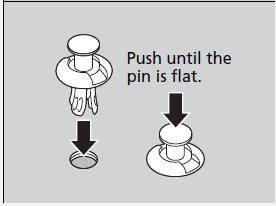
Insert the clip with the central pin raised, and push until it is flat.
 Fog Light Bulbs*
When replacing, use the following bulbs.
1. Loosen the screw using a Phillips-head
screwdriver.
- Be careful not to rotate the screwdriver
more than one or two times to the left.
...
 Side Turn Signal/Emergency Indicator Light Bulbs*
Door mirrors have the side turn lights. Have an authorized Honda dealer
inspect and
replace the light bulbs.
...
See also:
Precautions and Procedures
General Precautions
NOTE: Some systems store data in memory that is lost
when the battery is disconnected. Before disconnecting
the battery, refer to Battery Terminal Disconnection and
Reconnectio ...
Anti-lock Brakes (ABS)
The anti-lock brake system (ABS)
helps prevent the wheels from
locking up, and helps you retain
steering control by pumping the
brakes rapidly, much faster than a
person can do it.
The elec ...
Power Mirror Actuator Replacement
Removal
1. Remove the mirror holder (see page 20-63).
2. Remove the power mirror (see page 20-62), and
disconnect the power mirror 8P connector from the
door wire harness.
3. Remove the gaske ...